

Every summer, we tackle a handful of outdoor projects. I thought this one was definitely worth sharing!
The hubs and I were sick of buying those metal outdoor fire pits that you find at just about any local home store. They look nice for about 10 minutes before decaying into a pile of rust, transforming what should be a nice evening roasting marshmallows into a fearful game of ‘who’s up to date on their tetanus shot‘. Not cool. We were about to chuck our 5th one to the curb and go shop for another when I fell in love with the idea of a stone fire pit. But I was shocked by the price tag: $1500 to $2000 (stones + labor). Yikes! I did a little more research and felt pretty confident we could buy the supplies and do it ourselves for a fraction of the cost. I was right! Got 2 hours and $233 dollars? Great, keep reading for step by step how-to details.

1. THE SUPPLIES
- 68 retaining wall stones: 17 stones per circle layer x 4 layers (the bottom layer is hard to see in the photo because it is 60% buried)
- 3 bags of rock dust
- 6 bags of pea gravel
- Construction adhesive (glue)
- Shovel, garden trowel, level, measuring tape, rope, rubber mallet, work gloves

Purchase 68 small angled-curved retaining wall stones (they come in two sizes: small or large. FYI ‘small’ measures 8 inches long x 4 inches deep). You need the kind with a small curve and slight angled pie shape so that you can easily form a circle. Otherwise, should you choose not to, you’ll need to take a week off work, polish up on your math skills and rent one of those stone cutters!! Shop around and look for sales. We purchased our stones for $1.77 each plus $35 for the delivery (trust me, you do not want to haul these babies in your car, they weigh 20lbs each). They come in three shades which I can describe best as sandy-grey, red-grey or cement-grey. You may want to buy a couple extra in case of breakage.
2. THE PREP
Start by deciding where you want the fire pit located and make a tight circle with 17 of the stones. Outline the circle using chalk, move the stones out of the way and start digging a trench: about 6 inches deep and 10 inches wide. Make sure it is level. This will be the trickiest part. Even the flattest of yards are not as flat and level as you think. We used a small level and a large laser level combined with a measuring tape and rope in several different bizarre ways to make extra sure we had it all worked out before continuing.

3. THE BUILD
Next, spread out the rock dust (about 2-3 inches deep of the stuff) and water it, walk and jump on it (this will help settle and stamp it all down) . Then get back on your knees and make sure it’s level again. You may find that you have to scrape a little rock dust off or add some in a few spots.

Grab one stone, set it in place and tap it with a rubber mallet, use a small level to make sure it’s, well… level ! Then place another stone tightly next to that, and once again using a rubber mallet stamp it gently into the gravel dust, make sure it’s level and repeat another 15 times until first layer of circle is complete (17 stones per circle layer). If you have the occasional stone that is not level you should only have to add or remove a little gravel dust underneath it, remember to stamp it to set it in place before you continue.


Hooray! You’re done with the hardest part, now it’s time to finish this bad boy!

For the second layer you are going to sit each stone centered on the joint of the two stones beneath it (see photo). Make sure to butt each stone up tightly against the other. Repeat for the third and fourth layer. Wooho you’re done …er…maybe.

OK. I know what you’re thinking: “hey wait a minute, you have a square cut-out hole on the side of your fire pit -how come?“. You don’t HAVE to do this, however I recommend it because the ‘holes’ are actually air vents and provide air flow and circulation (as you know oxygen helps to feed a fire and keep it from dying out too quickly).
This is what you need to know: first of all there isn’t just 1 ‘hole’ air vent, there are actually 3 of them for a good cross breeze. The air vents are spaced out along that second layer. Which means the second layer will have 16 stones not 17. Don’t worry, I hate math more than you know, but even I could figure this out! Those 3 air vents are the equivalent width of 1 stone. So when you lay down your second layer add a 1/3 wide space every 4 to 6 stones you set. Next add the remaining 2 layers (17 stones per layer) as instructed above.
4. THE FINISH
Fill the bottom with a bit of dirt or sand and a couple of inches of gravel (we used pea gravel). Add a little back-fill to the front also (to fill in whatever gap is left between bottom 1st layer and your yard). Sprinkle a wide border of pea gravel along the exterior, not only with this make it look more clean and finished, but for safety it makes sense to not have grass, mulch or anything flammable that close to the fire pit.
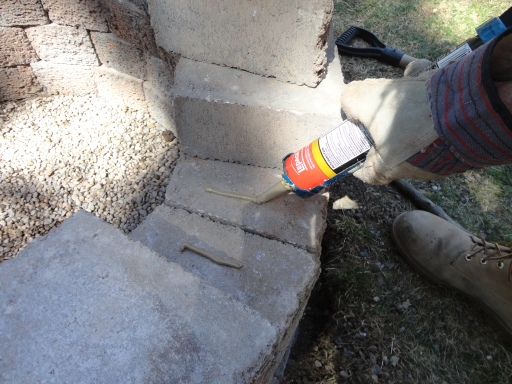
Finally when you’re happy with the fire pit, remove all but the bottom first layer and (gulp) put a dab or two of PL Premium Construction Adhesive under each stone as you re-build it.
“WHAT?!?!! – you had me up until now! There is no way I am doing this DIY project!”
I know, I know. BUT honestly this doesn’t take as long as you might think. I should have video taped my husband: in all but 10 minutes the fire pit was put back together!! Because, the main work of levelling, the troubles you encountered along the way, the air vents you had to calculate …have all been sorted out – and now you and this fire pit are like old pals! Of course you don’t have to glue it, but you run the risk of your fire pit looking misshapen after someone leans their big old feet on it one too many times: Do it once, do it right!
THE LOWDOWN
We did this project as a family. It was a great learning experience for the kids and they were a great help at hauling the stones from the front to the back yard! It took us only about a couple of hours, including a pic-nic lunch at the job site! ;-)
The approximate cost breakdown was $233 (not including taxes).
- $119 / 67 stones (1 less stone than original list because of air vents)
- $35 / shipping
- $48 / 6 bags of pea gravel
- $20 / 3 bags rock dust
- $11 / Construction adhesive
- *We already had all of the tools required.
I know it was a bit pricier than buying a ready made metal fire pit. However considering we probably won’t have to replace this one for years (a decade?) it will probably save us several hundred dollars. Plus it adds so much character to the landscaping and makes for a more welcoming spot to entertain!
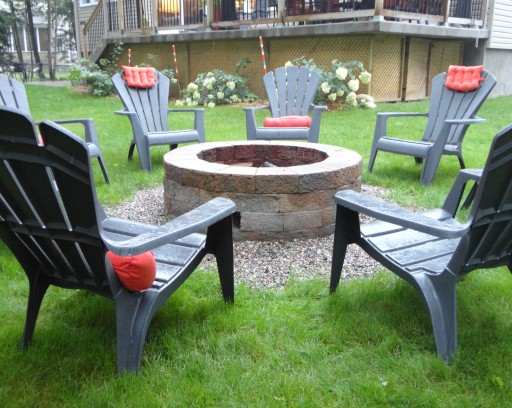


P.S. The eight charcoal Adirondack chairs are from Home Depot, and are plastic (of course I dream about having solid wood ones but these cost about 1/4 of the price, for now they’ll do just fine!). The orange-red alternating lumbar pillows and Adirondack head pillows are from PC HOME (seasonal) which I scored for $3.44 each. They didn’t have 8 left so I bought 4 of each and alternated one on each chair. Talk about budget decorating! ;-)
Thanks for checking in -let me know what you think. Is this a project you might do in your own backyard?
Julie
* Versions of this article were published on Bob Vila on September 11, 2013. The Gazette Vaudreuil Soulange on September 26th, 2013. DIY Home World on October 12, 2013 and on the cover of DIY Decorating Addict Magazine on May 20th, 2014.

You might also like…


You have so inspired me. It is beautiful.
Using a dead blow hammer instead of a rubber mallet will make this job much easier if your willing to spend the few extra bucks on one. You can also use a top cap to add a little extra to the look. Awesome tutorial and project. Any other ideas or help I had has been mentioned in other comments.
Could you tell me where you found those stones? I can only find the large ones.
Thanks
I got them at my local hardware store… Rona Hardware.
Seeing as this was article was published in Gazette Vaudreuil Soulange, I can assume that having a fire pit in my backyard in Vaudreuil-Dorion is allowed right? Would you happen to know? I would love to do this project!
No I don’t, sorry! I’m sure you can give a quick call to anyone at town hall to answer all question you may have. Good luck!
Hi. Love the firepit idea and am keen to give it a try. Are there any problems using the retaining stones? These would make the job much easier but concerned about longevity. A brick layer told us we should be using real stone or firebricks, not concrete blocks. Any comments?
Hi Katrina,
I have had no issues with these stones. And yes, I was also told that using fire rated stones would mean that my fire-pit would basically last forever. However the price was way more than I wanted to spend for this project. Sometimes you need to shell out the big bucks and make sure a job is done right the first time (like when we had pavers installed for a walkway and patio), but I figured we could try this on our own. I did some research and know that these stones may not last forever but will last at least a decade before I need to redo it -and I’m OK with that! :-) Good luck.
I plan on building a fire pit and stumbled across your site. I love the look. I had a quick question though. I noticed that you didn’t include a steel fire ring inside of your fire pit. Now that you have had it up for a while, have you noticed any issues without one? Thanks!
Thanks for your reply. I have seen fire pits built with the steel fire ring inside…but we did not install one and I have not noticed any issues or problems. Maybe overtime we will?! I’ll keep you updated! ;-)
Thanks
Julie
I built one similar about 4 years ago, only I put a layer of firebricks down( layed flat and just dry fitted on a 2″ bed of sand) as a base, instead of using stone dust. It makes it easy to shovel out ash after it begins to build up.
Hi Ron, Thanks for taking the time to comment -and giving that useful tip!
All the best,
Julie
I do have 1 question.
What are the dimensions of this pit after completion? (width, height…etc)
Thanks,Bob
Hi Bob. Good question, thanks. The fire pit measures approximately 48 inches across and 14 inches high. You can always build yours higher by adding another row. I wanted to make it higher and my husband insisted it was high enough. Turns out he was right! Our Adirondack chairs are pretty low, any higher and we wouldn’t be able to see into the fire pit as well.
Thanks!
Julie
This tutorial is awesome. My son would love this idea, so I am going to forward this to him. He’s made one before, but he’ll love yours. Great job!
Thanks Terry Ann! Be sure to show him the cooking grate my husband made for the fire pit too! Here is the link: https://julieloveshome.wordpress.com/2013/09/25/why-not-beast-it-for-dinner-tonight/
All the best!
julie ;-)
This is by FAR one of the best tutorials I’ve ever seen. Thorough, detailed, encouraging, and pictures!! Thank you so much!!
Thanks so much David! -And best of luck should you decide to tackle this project yourself -send me photos!
;-)
wow, best tutorial I’ve seen for a fire pit! Might have the courage to actually try next summer. Thanks!
Thanks so much! If you do, let me know how it turns out!
Nice tutorial! Enjoy your s’mores!
Thanks so much!
nice job, you just need some winmers